
11 July 2022
Make a micro:bit data logging app

The previous data-logging with the micro:bit posts I aimed at teachers, like myself, with little or no computing background. Whilst writing those, I learned a lot about micro-controllers, device-to-device communication, and how to use sensors. It gave me a newfound confidence in my limited coding skills (I learned BASIC at A Level, enough said !). I thought it was time to step outside my comfort zone and tweak my 'nerd gene' (admit it we all have one).
I had heard of the MIT's App Inventor a while ago, and I knew that you could the micro:bit via Bluetooth to a mobile device or tablet. Inevitably, after a few minutes browsing I found the tutorials I needed to do this. The next thing was would understand them, so there was nothing left to do but dive in.
I found this sister site of MIT's - https://iot.appinventor.mit.edu/#/ along with lots of other tutorials for projects with Internet of things. It has a micro:bit section https://iot.appinventor.mit.edu/#/microbit/microbitintro covering these areas:-
- Microbit_Accelerometer - access the micro:bit's onboard accelerometer.
- Microbit_Button - receive messages when the micro:bit's buttons are pressed.
- Microbit_Io_Pin - configure the onboard pins of the micro:bit and read analog and digital values from the pins and write both analog and digital values to the pins.
- Microbit_Io_Pin_Simple - a simpler interface to interact with the micro:bit's onboard pins.
- Microbit_Led - print strings and custom images to the micro:bit's LED matrix.
- Microbit_Magnetometer - get heading/bearing information from the micro:bit.
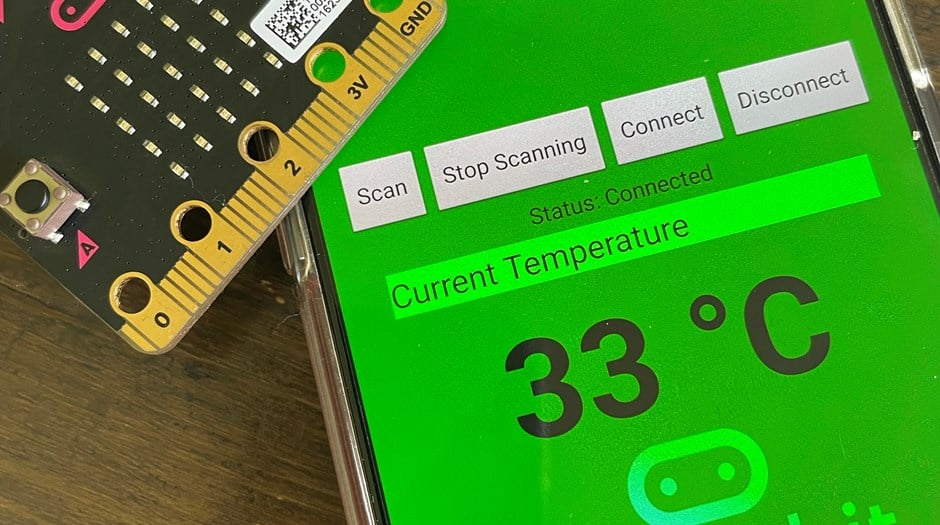
- Microbit_Temperature - get external temperature readings (in degrees Celsius) from the micro:bit.
- Microbit_Uart - send and receive messages using the software serial port (UART) interface for the micro:bit. This can be used to send messages to custom software installed on the micro:bit.
I immediately clicked on the Micro:bit Temperature Project. This took me to a page where I could download this PDF. On reading I first had to " complete the App Inventor
+ IoT Basic Connection tutorial to make a basic connection to the micro:bit device." Clicking the link gave me some errors. I managed to find it here - https://iot.appinventor.mit.edu/assets/tutorials/MIT_App_Inventor_Basic_Connection.pdf
Not having used App Inventor this was a good introduction. I did find however the link to the Bluetooth extension is out of date so use this one - https://iot.appinventor.mit.edu/#/bluetoothle/bluetoothleintro
After about an hour I managed to get the App working and the micro:bit connected to my Andriod phone. Use this guide to put your micro:bit into Bluetooth pairing mode. - https://support.microbit.org/support/solutions/articles/19000051025-pairing-and-flashing-code-via-bluetooth
Next was to connect the micro:bit. The first thing to do is add a little bit of code to the micro:bit to start the Bluetooth services. So in makecode blocks, I created the following. First Add the Bluetooth extension. Goto Extensions and search Bluetooth. Next create the following lines of code and download to the micro:bit.
Now back to the first PDF showing how to add the code to the Bluetooth connection code to read and display the temperature. I found that the extension microbit-temperature, that is recommended in the tutorial would not work for me. So I used the general Microbit extension and change the detail in the code and it worked fine.
This activity continues to illustrate that micro:bit is a highly versatile micro-controller and can provide a myriad of opportunities for young people to learn to program and develop.
I think I could try this activity with good year 6 pupils, but definitely Yr7-9. I welcome your thoughts if you tried it with a class or had a go yourselves
Spotted an Issue?
Creative KS3 Computing with a micro:bit - CAS Physical Computing TC meeting

Strype: Python with a blocks-like interface, in the browser - CAS Secondary TC meeting
Raspberry Pi Foundation's Code Editor - TC meeting

FREE Careers resources from BCS & Tech She Can - Primary & Secondary TC meeting
Let's get physical - how to use Crumbles, Spheros & Microbits - Physical Computing TC meeting
DataFace - what is it and how can you get involved? Secondary TC meeting
Mission Encodeable - Making programming fun - Secondary TC Meeting
Getting started with Epic's Unreal Editor for Fortnite - Interactive 3D TC Meeting
Free resources - get started with Epic's Unreal editor for Fortnite
Lots happening in January
